About Saperion installation
Once you have set up your system, you can install Saperion. Both a 32-bit and a 64-bit Saperion setup.exe file are available for your needs. Note that you must mount the ISO image containing the installer file as a drive.
Before you start the Saperion client for the first time, you must set up at least the following components.
-
a medium
-
a server pool
-
a global pool
-
a write buffer.
Install a distributed system
To install a distributed system, perform the following procedures.
-
Install a download directory.
-
Install the required servers using the installation MSI file.
-
Install the clients.
Install a Saperion Download directory
When you install Saperion as a Download directory, the installer creates a download directory on the computer. This directory contains all files necessary for the servers and clients distributed across the network.
To install Saperion Download directory, complete the following steps.
-
Double-click the setup.exe file to open the Saperion 8.1 Setup dialog box.
-
Select the installation language and the 32-bit installation target platform. Click Next.
Optional Specify a log file for logging the installation steps.
-
Click Next.
-
In the Select Installation Type page, select the Saperion Download Folder radio button and click Next.
-
In the Destination Folder page, select the installation directory. The default directory for the 32-bit installation is [drive:]\\{path}\Program Files(x86)\Saperion. To change it, click the Browse button. Click Next.
-
In the Personal Information page, enter the serial number you were provided and the associated license key. Click Next.
The combination of the serial number and license key allows Saperion to recognize which program options are available to you.
-
In the Select Features page, select Download and click Next.
-
In the System Defaults page, type the following information.
-
NamedPipe and IpHost
The default value of the current computer.
-
Default language
Select the system language from the drop-down list.
-
Default mail option
Select the type of e-mail connection you wish to use from the drop-down list.
Click Next.
-
-
Click Next to start the installation.
The installation creates a Share directory. This directory is used to install servers and clients on other computers. You can change the name of the directory if you need to.
Install a 64-bit Saperion server
You can install a Saperion 64-bit server by completing one of the following installations.
-
Central download installation
-
Standalone installation
We recommend you use the central download installation.
About 64-bit server limitations
The 64-bit serve has some limitations. You will not be able to use the following features.
-
Long-Term Archiving and Notary Service (LTANS)
-
Secrypt Server
-
Cypress Macro editor from Cypress Software
-
Annotation creation in the Web Client
-
Server-based rendering
In addition, if you plan to use the dtSearch Engine, you must activate this feature manually.
To use the dtSearch Engine feature, set the following parameter in the PROGRAM.INI.
[Modules64]
Retrieval=DTSEAR64.RET
You can use the Black Marker and Stamp annotations in the Web Client, but with the following restrictions.
-
When you apply Black Marker annotations to documents in the Rich Client, users who do not have the appropriate privileges cannot read the blackened text passages. On a 64-bit core server without Legacy Service, you cannot display the document in the Web Client viewer at all, nor can you download it.
When the user has the appropriate privileges, the complete document is visible in the Web Client, including annotations.
-
When you apply stamps in the Rich Client, these are handled in the same way as Black Marker annotations. On a 64-bit core server without Legacy Service, the stamp will not be visible, only the document.
Install a Central Download installation
This type of installation creates a download directory on the current computer. The directory contains all files necessary for the server and clients distributed on the network. In the directory, the installation also creates the PROGRAM.INI, which contains details about the installation directory of the core server, such as the IP address.
To install a Download directory, you must complete the following two steps:
-
Install a download directory
-
Install a 64-bit server.
Install the Download directory
First, install the download directory using the setup.exe file and selecting a 32-bit installation target platform.
Install the 64-bit server
Once you have installed the download directory, install a 64-bit server. You will need a 64-bit license key as well as either a CPU license or a core server license.
To install a 64-bit Saperion server, complete the following steps.
-
Double-click the setup.exe file.
-
Select the installation language and the 64-bit installation target platform. Click Next.
Optional Specify a log file for logging the installation steps.
-
Click Next.
-
In the Destination Folder page, use the Browse button to select the path to the central installation folder, which is the same directory where your PROGRAM.INI is located. Click Next.
-
In the Personal Information page, select the "Central Download Installation" radio button. Then use the Browse button to select the PROGRAM.INI for the Central Installation Folder.
-
In the same page, click the Get license button to get the serial number and license key from the central download directory and automatically enter them in the corresponding text fields. Click Next.
-
In the Select Features page, select the following features.
-
Sample Project File Application
-
Fulltext
Click Next.
-
-
In the ODBC Source page, type the following information about the ODBC data source in use.
Note The ODBC data source must be set up before installing Saperion.
-
DSN
Because you selected the 64-bit installation target platform, the installer lists the 64-bit data sources. Select the desired source.
-
DB User
Type the user name of the database user in the text field.
-
DB Password
Type the password required to communicate with the database.
Click Next.
-
-
In the Set JAVA Path page, select the path to the java.exe you will use to start the Java Core Server. Click Next.
-
In the next page, define the Java Core Server options.
-
Click Next to complete the installation.
Install a Saperion stand-alone version
Note With the Saperion stand-alone installation, you cannot use the MMC for administrative access to the server.
To install a stand-alone version of a 64-bit Saperion server, complete the following steps.
-
Double-click setup.exe.
-
Select the installation language and select the 64-bit installation target platform. Click Next.
Optional Specify a log file for logging the installation steps.
-
Click Next to continue with the installation.
-
In the Destination Folder page, use the Browse button to select the path to the central installation folder, which is the same directory where your PROGRAM.INI is located. Click Next.
-
In the Personal Information page, select the Stand alone Core Server radio button. Type the serial number and license key in the provided text fields. Click Next.
-
In the Select Features page, select the following features.
-
Sample Project File Application
-
Fulltext
Click Next.
-
-
In the ODBC Source page, type the following information about the ODBC data source in use.
Note The ODBC data source must be set up before installing Saperion.
-
DSN
Because you selected the 64-bit installation target platform, the installer lists 64-bit data sources. Select the desired source.
-
DB User
Type the user name of the database user in the text field.
-
DB Password
Type the password required to communicate with the database.
Click Next.
-
-
In the Set JAVA Path page, select the path to the java.exe you will use to start the Java Core Server. Click Next.
-
In the next page, define the Java Core Server options.
-
Click Next to complete the installation.
Install a Saperion Legacy32 server
We strongly recommend that you use the Legacy Server when working with a 64-bit server. You install the Legacy32 Server by selecting the 32-bit target platform during installation, then register it in a 64-bit Saperion installation, using the setup.exe installation file. The following sections guide you through a complete new installation as well as installing the Legacy32 server when a 64-bit core server is already installed.
Note The Legacy Server and Java Core Server must run on the same machine.
About new installations
Before you can install a 64-bit installation, you must first have a download directory into which to copy all the files necessary for your network server and client. Use the setup.exe and select the 32-bit installation target platform to install the Legacy32 server.
In the second step, you'll install the 64-bit server, then establish a connection to the Legacy32 server you installed.
Set up the Legacy32 ServerTo install the Legacy32 server, complete the following steps.
-
Double-click the setup.exe file to open the Saperion 8.1 Setup dialog box.
-
Select the installation language and the 32-bit installation target platform. Click Next.
Optional Specify a log file for logging the installation steps.
-
Click Next to continue with the installation.
-
Select the Saperion Download Folder radio button and click Next.
-
In the Destination Folder page, use the Browse button to select the path to the central installation folder, which is the same directory where your PROGRAM.INI is located. Click Next.
-
Next, type the serial number and corresponding license key. Click Next.
-
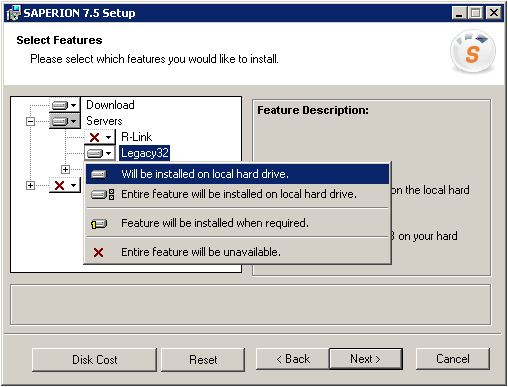
In the Select Features page, select the Download feature and click Next.
-
Under Servers, select the Legacy32 option. Then click Next.
-
In the System Defaults page, type the following information.
-
NamedPipe and IpHost
The default value of the current computer.
-
Default language
Select the system language from the drop-down list.
-
Default mail option
Select the type of e-mail connection you wish to use from the drop-down list.
Click Next.
-
-
In the Logon Information page, specify the user account you will use to execute a service. Click Next.
-
In the Client Options page, you can select a scanner driver. You can also make or change these settings later. Click Next.
-
Click Next to start the installation.
Before you can use the Legacy32 server, you must register it on a 64-bit version of Saperion. This section describes how to register the server while doing a new 64-bit Saperion installation.
To register the Legacy32 server, complete the following steps.
-
Double-click the setup.exe file.
-
In the Setup dialog box, select the installation language and the 64-bit installation target platform and click Next.
Optional Specify a log file for logging the installation steps.
-
Click Next to continue with the installation.
-
In the Destination Folder page, use the Browse button to select the path to the central installation folder. Click [Next].
-
In the Personal Information page, select the type of installation.
-
Stand alone Core Server
With this option, you must enter the serial number and corresponding license key manually.
-
Central download installation
When you browse to your PROGRAM.INI file, you can use the Get License button to automatically get your license information.
Click Next.
-
-
In the Select Features page, select the following features:
-
Core
-
PDF Tools
-
Connect to Legacy32 Server
Click Next.
-
-
In the Set JAVA Path page, select the path to the java.exe you will use to start the Java Core Server. Click Next.
-
In the next page, define the Java Core Server options.
-
Click Next to start the installation.
-
After you have installed the Legacy Server, check that the following entries are in your PROGRAM.INI. The installer sets the entries when you select the "Connect with Legacy32 Server" function.
[Modules32]
LegacyClient=lgclie32.DLL
LegacyServer=legsrv32.DLL
Add a Legacy32 Server to an existing installation
In this section, we describe how to install a Legacy32 Server when you have already installed a 64-bit core server and a download directory. This is basically a system update in which you add the Legacy32 Server.
-
Double-click setup.exe to open the Saperion 8.1 Setup dialog box, and select the 32-bit installation target platform.
-
Since you have already installed Saperion, the Application Maintenance dialog box appears. Select the Modify radio button and click Next.
-
In the Select Features page, select the Legacy32 feature. Click Next to start the installation.
-
To register the Legacy32 server, double-click the setup.exe file, and in the Setup dialog box, select the 64-bit installation target platform.
-
Select the Modify radio button and click Next.
-
Select the Connect to Legacy32 Server option and click Next.
-
Click Next to start the installation, then click Finish to complete the installation.
-
After you have installed the Legacy Server, check that the following entries are in your PROGRAM.INI:
[Modules32]
LegacyClient=lgclie32.DLL
LegacyServer=legsrv32.DLL
Note A DLL file, zzip32.dll, may restrict your ability to send emails using the latest version of Microsoft office. This file is required if you use the "Authenticate" or "Automatic unzip in tray" feature. If you do not use any of these features, rename the DLL file to zzip32_backup.dll or remove it from the installation directory.
Start the Saperion Legacy32 Service
After you have installed the Saperion Legacy32 server, you can start it as a service. By default, the service is automatically installed in the local system account.
Note We recommend using an account other than the local system account to register the Saperion Legacy32 server service. Ensure that you start the Java Core Server and the Saperion Legacy32 server service from the same account.
You can make modifications to the account in the properties of the Legacy32 server service.
About Java Core Server options
During the Saperion setup, you are asked to specify certain parameters for the Java Core Server in the Saperion Java Core Server options page. These are written to a configuration file. In this chapter we describe the configuration file for the data source, and list specific information for the following servers.
-
Microsoft SQL Server
-
Oracle
The dataSourcesConfiguration.xml file
Beginning with Saperion version 8, the Java Core Server uses a new configuration file to read the configuration of JDBC data sources. In previous versions of Saperion, these settings were stored in the [ApplicationServer] section of the archief.ini file.
The new configuration file is called dataSourcesConfiguration.xml and is located in [drive:]{path}scr\scr-javacoreserver\config.
About dataSourcesConfiguration.xml
You can list multiple databases in the dataSourcesConfiguration.xml file. Saperion supports Oracle and Microsoft SQL Server databases. The following sample file includes settings for both.
Example
<dataSourcesConfiguration>
     <dataSources>
         <dataSource>
             <databaseEngine>ORACLE</databaseEngine>
             <driver>oracle.jdbc.driver.OracleDriver</driver>
             <isolation>READ_COMMITTED</isolation>
             <name>Oracle12</name>
             <offline>false</offline>
             <password>5hSY3/CXGEmnLWNDCTbAkg==</password>
             <queryTimeout>60</queryTimeout>
             <schema>CHM</schema>
 <url>jdbc:oracle:thin:CHM@10.184.245.29:1521/ORADB</url>
             <user>CHM</user>
         </dataSource>
         <dataSource>
             <databaseEngine>MS_SQL</databaseEngine>
             <driver>net.sf.log4jdbc.DriverSpy</driver>
             <isolation>READ_UNCOMMITTED</isolation>
             <name>usermanagement</name>
             <offline>false</offline>
             <password>b6auU8WVCP+nLWNDCTbAkg==</password>
             <queryTimeout>60</queryTimeout>
             <schema>dbo</schema> <url>jdbc:sqlserver://127.0.0.1:1433;instanceName=MSSQLSERVER;database=usermanagement;encrypt=true;trustServerCertificate=true;</url>
             <user>saperion</user>
         </dataSource>
         <dataSource>
             <databaseEngine>MS_SQL</databaseEngine>
       <driver>com.microsoft.sqlserver.jdbc.SQLServerDriver</driver>
             <isolation>READ_UNCOMMITTED</isolation>
             <name>saperion2</name>
             <offline>false</offline>
             <password>b6auU8WVCP+nLWNDCTbAkg==</password>
             <queryTimeout>60</queryTimeout>
             <schema>dbo</schema>  <url>jdbc:sqlserver://127.0.0.1:1433;instanceName=MSSQLSERVER;database=saperion2;</url>
             <user>saperion</user>
         </dataSource>
     </dataSources>
     <defaultDataSourceName>saperion</defaultDataSourceName>
 <userManagementDataSourceName>usermanagement</userManagementDataSourceName>
 </dataSourcesConfiguration>
The following table lists the tags used in the data sources configuration file and their descriptions. These parameters replace those used previously in the [ApplicationServer] section of the archief.ini file.
| Parameter before Saperion verison 8.0 | Parameter | Description |
|---|---|---|
| defaultDataSourceName | Contains the name of the default data source. The name of a data source corresponds with the name of the old ODBC data source. A data source with this name must be present in the list of data sources. | |
| userManagementDataSourceName | Contains the name of the data source that is used for the user management. If left empty, the user management uses the default data source. If it is not empty, a data source with this name must be present in the list of data sources. | |
| dataSources | Contains the list of data sources. | |
| dataSource | Represents a single data source with the properties listed below. | |
| dbname | name | Name of the data source (case-sensitive) |
| dbdriver | driver | Fully qualified class name of the JDBC driver. |
| dbtype | databaseEngine | Type of database in use. Valid values are MS_SQL and ORACLE. |
| schema | schema | Schema name |
| dbpoolurl | url | JDBC URL used to connect to the data source |
| dbisolationlevel | isolationLevel | Isolation level for transactions. Valid values are READ_COMMITTED and READ_UNCOMMITTED. Note that Oracle only supports READ_COMMITTED. |
| dbpooluser | user | Username used to log in to the database. |
| dbpoolpass | password | Password used to log In to the database (will be encrypted). |
| dboffline | offline |
Can be used to temporarily switch off a data source. Valid values are True and False. Note If datasource is set to offline, no error for datasource disconnection is reported in the log files, unless the log level is set to 'TRACE'. |
| dbquerytimeout | queryTimeout | Default timeout of queries (in seconds). |
Note:
To configure a timeout which, when exceeded, leads to a new user login, manually set the CleanupTimeout (in seconds) in the [Broker] section of the ARCHIEF.INI.
New installation
If you are installing Saperion for the first time, the dataSourcesConfiguration.xml file contains only the dataSourcesConfiguration, defaultDataSourceName and userManagementDataSourceName tags. You must then add each data source manually.
Update from Saperion 7.5.x to 8.1
If you are updating from a previous version of Saperion to version 8.1, the system migrates your data source information: When you start the Java Core Server, it first checks whether data sources are configured in the new configuration file (dataSourcesConfiguration.xml). If no data sources are configured, the server tries to read the old configuration from the archief.ini file. If the server finds data sources there, it adds them to the new configuration and saves them in the new configuration file. The system moves the settings from archief.ini to the [ApplicationServer.Backup] section in the new file. This section is for backup purposes only.
If neither configuration file contains data sources, the server fails to start.
Migrate data sources for user management
You can only migrate the data source used for user management if the data source was also previously used as a JDBC data source. If no JDBC data source with a matching name is found, the server fails to start. You must then manually add the data source to dataSourcesConfiguration.xml.
About the Microsoft SQL Server
In this section, we describe some features specific to the Microsoft SQL Server configuration.
Use Windows Authentication in the Microsoft SQL Server
You can use the integrated Windows authentication to enable the Java Core Server to access a Microsoft SQL Server database. To do so, make the following modifications in the respective configuration files:
-
dataSourcesConfiguration.xml
First configure the database settings in the dataSourcesConfiguration.xml file.
jdbc:sqlserver://127.0.0.1:1433; integratedSecurity=true;instanceName=MSSQLSERVER;database=usermanagement; You enable Windows authentication with the integratedSecurity = TRUE parameter. You can leave values for the <user> and <password> parameters empty.
-
User rights
To successfully log in to the database, you must run the Java Core Server under a user account on this database. The user account should have all the privileges needed for this database (database owner).
-
sqljdbc_auth.dll
You also need a DLL file for Windows authentication. The sqljdbc_auth.dll file is part of the Microsft JDBC SDK. Download the file from the Microsoft website, then copy it to the Saperion installation directory. For a 64-bit server, this might be [drive:]\\{path}Program Files\Saperion\Application\server64\sqljdbc_auth.dll.
Note You are not required to download the mssql-jdbc_auth-8.2.2.x64.dll file separately because this file is included in the intallation package.
About Oracle
Depending on the version of the Oracle database you are using, there are some things to be aware of.
Use Oracle version 11.2 with Java version 1.7
When using Oracle version 11.2 or higher together with Java version 1.7 or higher, you must use the ojdbc6.jar.
To do so, complete the following step.
-
Copy the ojdbc6.jar file into the [drive:]\\{path}\scr-javacoreserver\lib directory and remove the existing ojdbc14.jar.
You can copy the ojdbc6.jar file from the installation directory of your Oracle client on the server, or you can download it from the Oracle website.
Use Oracle version 12c
The ODBC driver included with Oracle 12c doesn't work well with XML fields. The driver supports CLOBs (Character Large Objects).
To be able to work with Oracle 12c, you must execute the following tasks, which are described in more detail in the sections below.
-
Update archief.ini file
-
Update hibernateNamedQueries.properties file
-
Convert any existing XMLTYPE columns to CLOB columns
-
Use backslash (/) instead of colon ( : ), and the service name instead of SID, in dbpoolurl.
Note When using Oracle 12c with Saperion, the MAX_STRING_SIZE instance parameter must remain set to STANDARD. If set to EXTENDED, Saperion cannot create function-based indexes correctly.
Update the archief.ini file
In your archief.ini file, in the [odbc.setup32.<dsn>] section, add the following lines.
[Odbc.setup32.<dsn>]
NameXML=CLOB
SQLTypeXML=1
SQLTypeXMLInsert=1
SQLTypeXMLFetch=1
Update the hibernateNamedQueries.properties file
In “C:\Program Files (x86)\SAPERION\scr\scr-javacoreserver\config”, update your hibernateNamedQueries.properties file by adding xmltype to SYSPROPERTIES.
Example
get_folder_properties_oracle= SELECT t.XHDOC as id_source, extractValue(itm.column_value, '/property/@name') as my_value_name, extractValue(itm.column_value, '/property/@type') as my_value_type, extractValue(itm.column_value, '/property/values//value') as my_val FROM $schema$.$entity$ t, TABLE(SELECT xmlSequence(extract(xmltype(SYSPROPERTIES) , 'properties//property')) from $schema$.$entity$ t1 where t1.XHDOC=t.XHDOC) itm WHERE t.XHDOC=:xhdoc AND t.SYSPROPERTIES is not nullConvert existing XMLTYPE columns to CLOB
If your database has existing XMLTYPE columns, you must convert them to CLOB by completing the following steps.
-
Add a new CLOB column to the database table.
alter table xnmain_10000001 add csysproperties clob; -
Copy values from the XMLTYPE column to the new column and convert them to CLOB.
update xnmain_10000001 set csysproperties = to_clob(sysproperties) where sysproperties is not null; -
Rename the XMLTYPE column.
alter table xnmain_10000001 rename column sysproperties to oldsysproperties; -
Rename the new CLOB column to the original XMLTYPE column name.
alter table xnmain_10000001 rename column csysproperties to sysproperties; commit; -
Delete the original XMLTYPE column that you renamed in step 3.
Note regarding url
With Oracle 12c, when defining the url, you must use service names instead of SIDs, and use a backslash ( / ) to add the service name. The general form is as follows.
jdbc:oracle:thin:[user/password]@[host][:port]/[service_name]
jdbc:oracle:thin:[user/password]@//[host][:port]/[service_name]
About restrictions with multiple databases
Keep the following limitations in mind when integrating multiple databases with the Java Core Server.
-
System tables
All system tables, such as xnmain, xlocks or xrevise, must always be on the default data source.
-
File application/Outliner application
When you use the File application or Outliner application, you must keep the corresponding documents DDC and folder DDC in the same database.
-
Document collections
To add documents to document collections, you must keep the documents DDC on the default database.
-
IXOS connector
You must keep the DDC for the IXOS connector on the default database.
-
Fulltext search
When you are using multiple data sources via the Classic Connector, and these data sources are on different database systems such as MSSQL and Oracle, the fulltext search only works in the default data sources.
Verify the configuration
You can use a tool such as the JConsole to view your data source settings, by connecting to the Java Core Server and viewing the DataSource attribute.
When you add data sources, a custom object-related mapping for access to the tables is created for each one. To verify the mapping, complete the following step.
-
In the saperion.properties file, specify the optional parameter writeHibernateMapping=TRUE.
When you restart the Java Core Server, XML files containing the mapping content are generated. The files are named hibernateConfig-<Name of the data source>.xml and stored in the Java Core Server configuration directory. The XML files only verify the mapping, and are overwritten when you restart the Java Core Server.
Set up a Saperion Client
Prerequisites
Before you set up a Saperion client on a computer, you must have a download directory whose path is known. You must also have configured sharing. If you have installed Saperion without the “Saperion Download directory,” the client installation adds some files to the root directory of the client and deletes the program.ini and archief.ini from the application directory. As a workaround, please complete the following steps.
- Create a backup of the *.ini files from the client installation before you update the client.
- Follow the installation steps to install the Saperion client using the Saperion Setup file.
- Move the newly created files from the Saperion folder to the Saperion\Application folder.
- Restore the backup files.
To install the Saperion client, perform one of the following procedures.
-
Install using the Saperion setup
If you are installing clients that will be used to administer the Saperion system, use the Saperion setup, where you can select the MMC snap-ins.
-
Install a Client Installation, also called the CLIENT.INI Installation, with dynamic update and without the installation MSI file.
Install using the Saperion setup
The Saperion setup installation is primarily used for clients with features such as special options or scanners.
To install the client, complete the following steps.
-
Double-click the setup.exe file.
-
Select the installation language and the 32-bit installation target platform. Click Next.
Optional Specify a log file for logging the installation steps.
-
Click Next to continue with the installation.
-
Select the Saperion Client radio button and click Next.
-
Select the installation directory. The default directory for the 32-bit installation is [drive:]\\{path}\Program Files(x86)\Saperion. To change it, click the Browse button. Click Next.
-
In the Personal Information page, use the Browse button to select the path to the central installation folder, which is the same directory where your PROGRAM.INI is located.
-
Then use the Get License button to automatically obtain the serial number and the corresponding license key from the PROGRAM.INI you specified with the install path. Click Next.
Depending on which license key you purchased, you can activate additional options on the client side.
-
Sample Project File Application
-
MMC Snap-Ins
-
Barcode
-
OCR
-
Scanner
-
KOFAX
-
COLD
-
Security
-
PDF Tools
Click Next.
-
-
Click Next to start the installation of the Saperion client.
-
Click Finish to complete the installation.
Install Example Scenarios
Saperion 8.1 includes new example scenarios. During the Saperion server setup, if you select the "Example scenarios" check box, the related mask and DDCs are automatically installed on the server. To import them in Saperion client, complete the following steps.
-
Copy the CSS and SDL files from the ISO located at \x86\scenario\optional\scenario\examplev81 to the client directory.
-
Start the client.
-
Copy the archie32.exe file from the central Saperion installation to the locally-configured Saperion directory.
-
Create a CLIENT.INI file in the local directory. This file must contain the path to the central download directory, and should be structured as follows:
[Config]
SourcePath=<path>
UseProxy=TRUE
LogEvents=TRUE
Parameter Description SourcePath Specify path as HTTP, FTP or file.
SourcePath=\\<computer name>\<Name of the released folder>
Examples
SourcePath=http://www.Saperion.de/example
SourcePath=ftp://ftp.Saperion.de
Using a secure SSL connection:
SourcePath=https://www.Saperion.de/example
UseProxy TRUE = Use the Internet Explorer proxy settings.
LogEvents TRUE = Activate event logging when you use CLIENT.INI to update.
Set to FALSE by default.
-
Run the local archie32.exe file to begin an automatic download.
-
signed
Must be signed by Saperion.
-
register
Will be registered after download.
-
You must have installed and started the core server.
-
You must be able to reach the core server over the network.
-
The Share directory must contain only the Program.init file.
-
Keep all files in the Application directory. Folders inside the Application directory can be removed as needed.
-
Do not remove the Global Assembly Cache directory.
-
Keep the finered9, kofax and security directories if you need these features.
-
Keep all files in the ubi directory.
-
In a text editor, create a file called "SilentFeature.ini" and save it to the directory containing the Saperion setup.msi.
-
Configure the file as described below.
msiexec.exe /i "<Path to setup.msi>" INSTALLDIR="<Target path for client installation>" SILENT=TRUE /q-
Copy the required files into the following directory: "[drive:]\{path}\x86\components\CustomFiles".
-
Execute the msiexec.exe file with the /x parameter.
msiexec /x "setup.msi" /q -
64-bit core server
regsvr32 /n /i:BrokerService:"SAPERION Core Server" base64.dll -
Application server
regsvr32 /n /i:AppService:SASRV32 base32.dll -
R/Link
regsvr32 /n /i:SAPService:SARLSR32 base32.dll -
Java Core Server
Start the "InstallJavaCoreServer-NT.bat" file. This file is delivered with the Saperion distribution and can be found in your Saperion installation directory under this path: ...\Saperion\scr\scr-javacoreserver\service
Do not install the Saperion Java Core service with a local system account. Use a regular service user from the local admin group instead.
-
Modify
Select Modify to install or remove individual options from your Saperion installation. The option displays a list of your installed features, which you can select or unselect, and then apply the changes to your installation.
-
Repair
Select Repair to reinstall a defective installation. You cannot modify options with this selection. If you have made any changes to your installation, they are overwritten.
-
Remove
Select Remove to remove Saperion from the computer, including registry entries and program files.
During deletion, you are asked if the entire program directory should be deleted. Select No to keep any definitions, forms and similar material you may have created in the program directory. If you select Yes, the entire directory is deleted.
Install using the CLIENT.INI
You can use the CLIENT.INI file instead of the installation MSI file to set up simple clients on which no special functions will be used.
This client installation is dynamic. It can carry out an update if necessary, such as when the system settings in the central system have changed, or load any missing components, for example after switching to another language.
Note Errors that occur during a CLIENT.INI download are recorded in the event log.
To install Saperion using the CLIENT.INI file, complete the following steps.
About the CLIENT.INI installation
When you install with the CLIENT.INI, both the Windows user starting the Saperion client, as well as the administrator, must have the necessary network access privileges to access the Saperion share directory. These privileges are independent of the administrator privilege need to register Saperion DLLs such as the CodeJock OCX.
Distribute custom files
To automatically distribute custom files, such as DLLs or configuration files, during installation, you must modify the server PROGRAM.INI file. In some cases you may also need to modify the User Account Control (UAC).
Sample configuration
[Distribute]
Test1=test1.exe
test2=test\test2.exe,signed
test31=test\sign1.exe,signed
The specified path is relative to the Saperion directory. You can specify two options after the file name.
About silent installations
Saperion supports silent installations of the Saperion client.
About the silent client installation
When you execute a silent client installation, the program files are installed without input from the user regarding information such as directory names, key, or serial number.
You execute a silent client installation by running the msiexec.exe file. The file is a Microsoft program which controls and automates the installation of MSI packages.
Note Do not execute a silent client installation on the same machine where a core server is already installed. Doing so overwrites existing server settings and can lead to errors.
About requirements
To use msiexec.exe to automatically install a Saperion client, your system must meet the following requirements.
Copy installation resources
The first step to doing a silent client installation is to copy the installation resources, found on the Saperion DVD, into a separate directory. Do not change the directory structure.
About software distribution
To do a software distribution, reduce the directory structure according to the following guidelines.
Configure the SilentFeature.ini file
A SilentFeature.ini configuration file must exist for all installations, whether new, update, modify or repair. If it doesn't, the installation is interrupted and a corresponding message written in the log file.
Although you follow the same steps to execute an installation, update or uninstallation for the silent client installation, you must configure the SilentFeature.ini file differently for each case.
To configure the SilentFeature.ini file for a silent client installation, complete the following steps.
[CLIENT]
Client=TRUE
SilentClient=TRUE
UBI=TRUE
MMCSnapIns=TRUE
Barcode=TRUE
FineReader9=TRUE
Inbound=TRUE
ISIS=TRUE
SCSI=TRUE
KOFAX=TRUE
Secrypt_Local=TRUE
COLD_LOCAL=TRUE
PDFTools=TRUE
[CORE_SERVER]
S_CORE=DokuTestW2003SQL
S_CORE_IP=<IP address>
S_LANGUAGE=German32.lng
[SYSTEM]
KEY=xxxxx
SERIAL=xxxxx| Parameter | Description |
|---|---|
| SilentClient | This option must be active (=TRUE) to execute the silent installation. |
| S_CORE | Core server named pipe. |
| S_CORE_IP | Core server IP address. |
| S_LANGUAGE | Language that should be activated for the client |
| KEY | License key. |
| SERIAL | Serial number. |
Execute the silent client installation
Once you have configured the SilentFeature.ini file, you can execute the installation.
Note To automatically install multiple clients, we recommend using installation scripts or tools for software distribution.
To execute the installation, use the following command.
To install Saperion without displaying the MSI interface, add the /q parameter.
Note You must capitalize the value for the SILENT parameter ("TRUE"). If you use lower-case letters ("true"), the value is evaluated as false.
You can also add any parameters supported by the msiexec.exe file. For example, to log output, add the /l parameter, as shown in the following example.
/l <Path>\<Logfile name>More information about parameters can be found on the Microsoft web site.
Remember to start the core server before starting Saperion.
Execute a silent client installation in Windows 8
When you use the administrator account to execute a client installation with the SilentFeature.ini file in Windows 8, the Saperion start icon is only created for the administrator.
To make the Saperion start icon available for all users, use the ALLUSERS parameter set to 1, as shown in the following command.
msiexec.exe /i "C:\download\saperion\setup.msi" INSTALLDIR="D:\saperion7" ALLUSERS=1 SILENT=TRUE /qNote You must capitalize the value for the SILENT parameter ("TRUE"). If you use lower-case letters ("true"), the value is evaluated as false.
Distribute custom files
While installing Saperion, you can distribute individual files to your client installations by copying such files into the "CustomFiles" folder. You might have files such as a PROGRAM.INI adapted to your own requirements or company-internal OCX-files that you would like to distribute. The installer copies these files automatically from the "CustomFiles" folder into the Saperion installation directory during a new installation, update or repair.
When distributing OCX files, make sure that the corresponding DLLs are also available.
To distribute individual files, complete the following step.
Update Saperion
To update a Saperion installation, use the same msiexec.exe file you use for new installations. In an update, only the features already installed are updated.
Uninstall Saperion
To use the msiexec.exe file to uninstall Saperion, complete the following step.
This removes Saperion from the list of installed programs and writes a corresponding entry in the log file.
Manually install Saperion servers as services
You can install the Saperion servers manually as services. You might have to do this if, for example, services were not set up properly by the installation program.
Note You must have administrator rights to register the services.
The following section lists the corresponding registry calls for the different types of servers.
About application maintenance
When you run the setup program on a computer with an existing Saperion installation, you can add or remove options. You can also use it to uninstall Saperion.
Note Adding and especially removing options can lead to errors or data loss in Saperion. Before you add or remove options, make a backup of your data.
The following options are available in application maintenance.