The following provides an overview of the FormPay process from an end user’s stand point.
1.In iFiller, a user opens a form that utilizes FormPay.
2. The user fills out the form.
3. The user clicks the FormPay “Pay” button.
4. If all the required information is provided, the secure Authorize.Net payment form will be displayed.
a. If an error occurs prior to the display of the Authorize.Net payment form, a dialog will appear with an error message. See the Error Cases section for more details.
5. The user enters the appropriate required information in the Authorize.Net payment form and clicks the Submit button.
6. If all the required payment information is not provided or invalid data (format wise) is entered (e.g. credit card number or expiration date), the Authorize.Net payment form will display the appropriate errors to the user to correct.
7. If all the required payment information is provided and is valid (format wise), the Authorize.Net payment form will close and Authorize.Net will attempt to authorize the transaction.
8. The result of the transaction will be displayed in iFiller on a receipt page.
9. If the transaction is approved:
a. the transaction results will be populated into the FormPay results form fields if they exist in the form
b. the form will be submitted to E-Forms Manager
· If an error occurs during form submission to E-Forms Manager, a dialog will appear with an error message. See the Error Cases section for more details.
c. the following transaction information will be displayed on the receipt page:
· Date/Time – date and time of transaction
· Transaction ID – assigned unique identification number for the transaction
· Authorization Code – authorization or approval code for the transaction
· Description – transaction description that was specified by the FormPay Handler
· Payment Method – credit card type and last four digits of credit card (e.g. Visa XXXX9883)
· Total – amount of transaction
· Invoice Number – invoice number that was provided for the transaction
· Billing Information – billing information provided for the payment
10. If the transaction is declined or an error occurs processing the transaction:
a. the following information will be displayed:
· Date/Time – date and time of transaction
· Transaction ID - assigned unique identification number for the transaction
· Reason – text that details the specific reason for the declined transaction or processing error
The following steps will be required to be completed before the FormPay feature can be used to facilitate credit card payments from a TransForm form. These steps will only need to be done once regardless of the number of forms that will use the FormPay feature.
1. Setup Authorize.Net Merchant Account
2. Configure E-Forms Manager and iFiller Installations
3. Configure Authorize.Net Merchant Account
4. License FormPay
In order to facilitate credit card payments with TransForm e-forms, an e-commerce (Card Not Present) Authorize.Net Payment Gateway account will need to be setup. Once the Authorize.Net account is setup, then the Authorize.Net Merchant Interface can be used to customize the account and retrieve the necessary information to configure the FormPay related items in E-Forms Manager.
All instances of E-Forms Manager and iFiller that will process “live” credit card transactions must be configured to allow secure connection to the credit card payment processor. In order for E-Forms Manager and iFiller to facilitate credit card payments, the installations must be configured as follows:
1. The E-Forms Manager and iFiller instance must be configured to run over SSL using the standard HTTPS port of 443, and
2. The E-Forms Manager and iFiller instance must be configured to be publicly accessible
Environments that use a web server (Apache, IIS, etc) to reverse proxy requests to E-Forms Manager and iFiller must ensure that the host name from the original incoming request is passed as the host when the request is proxied. In Apache this can be achieved by turning the ProxyPreserverHost directive on, and a similar property can be set for IIS. Other web servers should also have a similar way to configure this behavior.
The FormPay feature is an optionally licensed feature. As such, the E-Forms Manager license must have this feature enabled in order for the feature to be enabled in E-Forms Manager.
The following provides an overview of the steps necessary to configure FormPay for a form:
Add FormPay to TransForm Form’s Design
Configure FormPay Merchant Account
Configure FormPay Handler
Test TransForm Form
In order for a TransForm e-form to facilitate credit card payments through FormPay, the form design will need to contain specific objects. The table below specifies the FormPay related objects that can be added to the form design:
|
Design Objects |
Required? |
Description |
|
FormPay button and hidden field |
Required
|
A Button object that contains a Remote Command that will initiate the FormPay transaction must be added to the form. In addition, a hidden field named TransForm_efm_formpay_url must also be placed on the form. A pre-configured FormPay button and hidden field is provided in the Designer FormPay Catalog.
|
|
Amount field |
Optionally Required |
If the amount of the transaction should be specified by the form, then the form design should contain an EditBox field that will collect the amount. The EditBox field must:
|
|
Invoice ID field |
Optionally Required
|
If an Invoice ID will be specified by the form, then the form design should contain an EditBox field that will contain a unique identifier. This field will usually be read-only and populated by the FormID feature.
|
|
Billing Information fields |
Optionally Required |
If the billing information for the transaction will be provided by fields in the form, the form design should contain EditBox fields that will collect the appropriate billing information.
|
|
FormPay Result fields |
Optional
|
In order to have the results of a successful FormPay transaction populated into the form, the form design should contain specifically named EditBox fields. These EditBox fields can be either visible or hidden. See the FormPay Result Fields section below for the naming requirements of the fields. A set of FormPay Result fields is provided in the Designer FormPay Catalog.
|
Starting with E-Forms Manager version 8.3.0, a FormPay Catalog will be installed to My Forms\E-Forms Manager Sample Forms if the E-Forms Manager Sample Forms are selected to be installed during installation.
Following a successful credit card transaction, certain transaction results can be stored in the TransForm e-form before it is submitted to E-Forms Manager. The following table lists the transaction results that will be populated into specifically named form fields if they exist on the form:
|
Transaction Result |
EditBox FieldCode |
Description |
|
Authorization Code |
formpay_auth_code |
The transaction authorization or approval code (generated by Authorize.Net)
|
|
Transaction ID |
formpay_trans_id |
The assigned unique identification number for the transaction (generated by Authorize.Net)
|
|
Amount |
formpay_amount
|
The amount of the transaction
|
|
Card Type |
formpay_card_type |
Type of credit card that was used (e.g. Visa, MasterCard, etc)
|
|
Card Last Four |
formpay_card_last_four
|
Last four digits of credit card that was used (e.g. XXXX3454)
|
A FormPay Merchant Account specifies the information for the merchant account that will be used to process credit card payments. FormPay Merchant Accounts are defined in the Administration tab under FormPay. The following table lists the information that is used to configure a FormPay Merchant Account:
|
Field |
Description |
Required? |
Input |
|
Account Name |
Name to be assigned to the Merchant Account for identification within E-Forms Manager.
|
Required |
Enter a unique descriptive name for the merchant account.
|
|
Account Type |
The type of merchant account that will be used to process credit card payments |
Required |
Select Authorize.Net – Live to process real credit cards with a live payment gateway account. Select Authorize.Net – Development to use a development test payment gateway account to process test credit cards.
|
|
API Login ID |
The Authorize.Net merchant API Login ID
|
Required |
Enter the API Login ID that is specified in the Authorize.Net Merchant Interface.
|
|
Transaction Key |
The Authorize.Net merchant Transaction Key. Note: the Transaction Key is very sensitive and should not be shared, written down, or stored where it could be retrieved. |
Required |
Enter the Transaction Key that is specified in the Authorize.Net Merchant Interface.
|
|
Payment Enabled? |
Flag that indicates whether payments are enabled through this merchant account. Disabling payments to a merchant account will cause forms that use this merchant account to not accept payments.
|
Required |
Check the checkbox to enable payment; uncheck the checkbox to disable payment. |
A FormPay Handler is the configuration for a form version that specifies the merchant account and payment information that will be used during the FormPay transaction. The following information can be configured for a form version’s FormPay Handler: (note: only one FormPay Handler can be configured for a form version).
|
Field |
Description |
Required? |
Input |
|
Merchant Account |
The Merchant Account that will be used to facilitate the payment |
Required |
Select the merchant account.
|
|
Description |
Optional description of the transaction. |
Optional |
Enter a description that if supplied will be available to be displayed on Authorize.Net payment form.
|
|
Amount |
Placeholder or static value to be used as transaction amount.
|
Required |
Either enter a dollar amount (without the dollar sign e.g. 25.50) or select a constant or form field that will provide the amount for the transaction.
|
|
Invoice ID |
Form field that will provide the unique Invoice Id for the transaction. |
Optional |
Select a form field that will provide the unique Invoice Id for the transaction.
|
The following billing information can be entered in the second step of the FormPay Handler setup wizard:
|
Field |
Description |
Required? |
Input |
|
First Name |
Form field that will provide customer’s first name. If supplied the value of the selected form field will populate the First Name (Billing Information) field on the Authorize.Net payment form. |
Optional
|
Select the form field that will provide customer’s first name.
|
|
Last Name |
Form field that will provide customer’s last name. If supplied the value of the selected form field will populate the Last Name (Billing Information) field on the Authorize.Net payment form. |
Optional |
Select the form field that will provide customer’s last name.
|
|
Company |
Form field that will provide customer’s company. If supplied the value of the selected form field will populate the Company (Billing Information) field on the Authorize.Net payment form. |
Optional |
Select the form field that will provide customer’s company.
|
|
Address |
Form field that will provide customer’s address. If supplied the value of the selected form field will populate the Address (Billing Information) field on the Authorize.Net payment form. |
Optional |
Select the form field that will provide customer’s address.
|
|
City |
Form field that will provide customer’s city. If supplied the value of the selected form field will populate the City (Billing Information) field on the Authorize.Net payment form. |
Optional
|
Select the form field that will provide customer’s city.
|
|
State |
Form field that will provide customer’s state. If supplied the value of the selected form field will populate the State (Billing Information) field on the Authorize.Net payment form. |
Optional |
Select the form field that will provide customer’s state. |
|
Zip Code |
Form field that will provide customer’s zip code. If supplied the value of the selected form field will populate the Zip Code (Billing Information) field on the Authorize.Net payment form. |
Optional |
Select the form field that will provide customer’s zip code. |
|
Country |
Form field that will provide customer’s country. If supplied the value of the selected form field will populate the Country (Billing Information) field on the Authorize.Net payment form. |
Optional |
Select the form field that will provide customer’s country. |
|
Phone |
Form field that will provide customer’s phone. If supplied the value of the selected form field will populate the Phone (Billing Information) field on the Authorize.Net payment form. |
Optional |
Select the form field that will provide customer’s phone. |
|
|
Form field that will provide customer’s email address. If supplied the value of the selected form field will populate the Email (Billing Information) field on the Authorize.Net payment form. |
Optional |
Select the form field that will provide customer’s email address. |
A form that utilizes the FormPay feature should be tested thoroughly before being published and made available to end users. The form’s validation, FormPay configuration, and interaction with the payment gateway should be tested to ensure the form correctly facilitates credit card payments.
When testing the interaction with the payment gateway, the testing should be done in two phases. The first phase involves placing the live payment gateway in Test Mode and submitting test transactions. If the testing is successful in this phase, the second phase involves submitting live transactions with a real credit card to verify that it is processed correctly.
A merchant payment gateway account can be placed in Test Mode to allow test transactions to be processed without the transaction being submitted to financial institutions. Test transactions submitted in Test Mode are not stored in the Merchant Interface.
To test transactions:
1. Place the merchant payment gateway account in Test Mode (see Turning Test Mode On/Off).
2. Complete the steps in the Test Steps section below.
a. When entering a credit card number, use one of the following test credit card numbers:
• Visa Test Card: 4007000000027
• Second Visa Test Card: 4012888818888
• American Express Test Card: 370000000000002
• Discover Test Card 6011000000000012
b. The expiration date must be set to the current date or later.
In order to process real credit card transactions, the merchant payment gateway must be in Live Mode. Transactions submitted in live mode will be processed and submitted by a financial institution and the transactions will be stored in the Merchant Interface.
To test a transaction:
1. Place the merchant payment gateway account in Live Mode (see Turning Test Mode On/Off).
2. Complete the steps in the Test Steps section below.
In Live Mode, a real credit card number must be used. You can use any valid credit card number to submit a test transaction. You will be able to void successful transactions immediately to prevent live test transactions from being processed. This can be done quickly on the Unsettled Transactions page of the Merchant Interface. It is recommended that when testing using a live credit card, you use a nominal value, such as $0.01. For VISA verification transactions, you can submit a $0.00 value instead. Bill To address and zip code are required for VISA verification transactions.
To modify the Test Mode setting for a merchant payment gateway account:
1. Log in to the Authorize.Net Merchant Interface.
2. On the top menu (Home, Tools, Reports, etc), click Account.
3. Under the Security Settings section, click Test Mode.
4. The Test Mode page will display which mode the account is currently in.
5. Click the Turn Test ON button, to place the account in Test Mode.
6. Click the Turn Test OFF button, to place the account in Live Mode.
1. In E-Forms Manager, ensure that the form version’s FormPay Handler is enabled. Also, ensure that the FormPay Merchant Account that is used by the FormPay Handler has payment enabled.
2. View the form to be tested with iFiller.
3. Enter the required information for the form.
4. Click the “Pay” button on the form.
5. If all the required information is provided, the Authorize.Net payment form will be displayed. If an error occurs prior to the display of the Authorize.Net payment form, a dialog will appear with an error message.
6. Enter the appropriate required information in the payment form.
a. Check to make sure that any payment information that was configured in the FormPay Handler to be populated from the form is populated correctly (e.g. description and billing information).
b. For credit card number and expiration date, enter the appropriate information for the phase of testing that is being performed.
7. Click the Submit button.
8. Review the transaction details on the receipt page.
9. If the transaction was approved, ensure that the form was successfully submitted to E-Forms Manager.
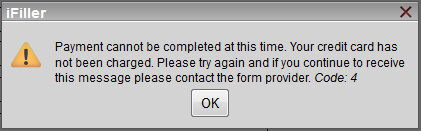
After a FormPay “Pay” button is clicked, if an error occurs prior to the display of the Authorize.Net payment form, an iFiller dialog will appear and display a message. The message will state the following:
“Payment cannot be completed at this time. Your credit card has not been charged. Please try again and if you continue to receive this message please contact the form provider. Code:Code#”
The Code# at the end of the message will be a number indicating the type of error that has occurred. The table below lists the possible codes along with its cause and description.
|
Code |
Cause |
Description |
|
0 |
General Error |
A general error has occurred that does not match any of the other causes. The E-Forms Manager and iFiller logs will need to be checked in order to get more information on the problem.
|
|
1 |
Invalid License |
The E-Forms Manager license is not valid. This could be caused by an expired license or if the submissions have surpassed the licensed submission capacity.
|
|
2 |
FormPay Feature Not Licensed |
The E-Forms Manager license does not contain the FormPay feature. Upload a license that contains FormPay.
|
|
3 |
FormPay Handler Not Configured |
The FormPay Handler has not been defined for the form version. Define a FormPay Handler for the form version to resolve the error.
|
|
4 |
FormPay Handler Disabled |
The form version’s FormPay Handler is defined but disabled. Enable the FormPay Handler to resolve the error.
|
|
5 |
Form Version Not Found |
The form version specified in the FormPay request cannot be found. This error is unlikely and if it occurs, the cause will probably be due to misconfiguration of E-Forms Manager and iFiller or caused by another system error.
|
|
6 |
Form Processing Disabled |
Form processing for the form version is disabled. Enable form processing for the form version to resolve the error.
|
|
7 |
Submission Disabled |
Submission of the form version is disabled. Enable submission for the form version to resolve the error.
|
|
8 |
Merchant Account Disabled |
The Merchant Account that is selected to be used by the FormPay Handler has payment disabled. Enabled payment for the Merchant Account to resolve the error.
|
The following table describes the errors that can occur after Authorize.Net processes a transaction but prior to the receipt page being displayed in iFiller and/or the form being submitted to E-Forms Manager:
|
Cause |
Error Message |
|
Error occurs after user clicks Submit button on Authorize.Net payment form but prior to the receipt page being displayed in iFiller. The Authorize.Net Transaction ID is not available.
|
An error occurred while trying to report your payment transaction to the merchant. It is advisable for you to contact the merchant to verify that you will receive the product or service.
|
|
Error occurs after user clicks Submit button on Authorize.Net payment form but prior to the receipt page being displayed in iFiller. The Authorize.Net Transaction ID is available.
|
An error occurred while trying to report your payment transaction to the merchant. It is advisable for you to contact the merchant and provide them with the Transaction ID TransactionID to verify that you will receive the product or service. (TransactionID will be the Transaction ID of the transaction)
|
|
Error occurs after user clicks Submit button on Authorize.Net payment form and receipt page is displayed in iFiller but before form is successfully submitted to E-Forms Manager.
|
An error occurred while trying to report your payment transaction to the merchant. The result of the payment transaction may be viewed on the page below. It is advisable for you to contact the merchant and provide them with the Transaction ID to verify that you will receive the product or service.
|