SQL Editing
Once you have created the SQL rule, you can modify it using the SQL Rule Editing page. You can access this page by going to:
- Indexes > [IndexName] > SQL Rules
- User Indexes > [User] > Indexes > [IndexName] > SQL Rules
Then click the name of the SQL rule you are interested in editing.
SQL Details
This section shows the name of the SQL rule you are editing, you can not change the name of the rule once it has been created.
Driver
This section shows the connection information for the SQL rule. The driver options can not be modified on an existing SQL rule, however you can change the connection string by clicking the Change Connection String button.
Driver
Indicates the type of driver being used, this will be either ADO or ODBC. This value cannot be changed.
Driver Module
Indicates the driver module that will be loaded to handle this database, for reference only. This value cannot be changed.
Connection String
Indicates the connection string for this SQL rule. A connection string contains all the properties that tell Perceptive Enterprise Search how to connect to your selected database. To change the connection string, click the Change Connection String button.
If you have made any other changes to the rule without saving them, these changes will be lost when you change the connection string.
SQL Statement
Depending on your rule type, you will either see the SQL designer or the SQL statement.
Modifying with the Designer
The Perceptive Enterprise Search SQL designer allows you to visually modify the SQL statement that is generated, it makes it easy for you to:
- Choose the columns to index
- Add/Remove tables
- Identify table relationships
- Identify Key columns
- Identify Title column
Adding another table
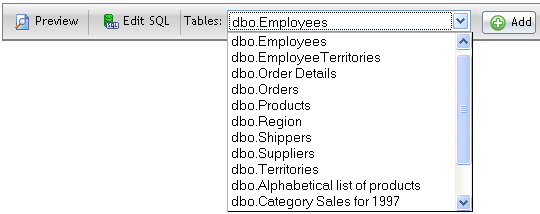
To add another table to your SQL statement, select the table you wish to add from the Tables drop down box on the toolbar and click the add button.

Removing a table
To remove a table, right click your mouse on the table name and select "Remove Table".
Adding New Joins
Perceptive Enterprise Search will try to identify and automatically join any selected tables, if this is not possible, you will need to manually join the tables before you proceed. To join two tables, select the column from the first table then drag it to the column in the second table and release the mouse button.
The relationship between two tables is indicated by a line with arrows between the two tables. The arrows point to the columns that join the tables.
Join Options
You can control how two tables are joined by right clicking on the relationship line.

All Matching Rows indicates that only records that have values in both tables will be indexed.
All Rows from "X Table" indicates that all records from the X table will be indexed and only the records from Y table where the joined fields are equal.
All Rows from "Y Table" indicates that all records from the Y table will be indexed and only the records from X table where the joined fields are equal.
Delete Relationship will remove the relationship between the two tables.
Modifying the SQL text
If you have chosen to modify the SQL manually, you will have complete control over the SQL statement Perceptive Enterprise Search will use.
Perceptive Enterprise Search SQL statements serve a dual purpose:
- to return all the records in the RecordSet;
- and to return a specific record given a set of keys.
For the most part, the SELECT and FROM section of the statement is identical, it is only the WHERE clause that needs to be changed when selecting specific records. To handle this scenario, you can have a single SQL statement with the record selection criteria contained within {{ and }}. When Perceptive Enterprise Search needs to return all records, it will execute the SQL statement omitting the {{ ... }} section. When it needs to fetch a particular records, it will execute the SQL statement with the {{ ... }} section in place.
Perceptive Enterprise Search looks for specially named columns in your SQL dataset that it uses during its indexing, the most important is the identification of key columns. To identify a key column, it must be aliased to ISYS_KEY_# where the # is a number starting from 0. Each key must also be added to the {{ ... }} section in the form of a parameter, where "FieldsName = ?". The parameters must appear in there in ISYS_KEY_# sequence, ISYS_KEY_0, ISYS_KEY_1 and so on.
You can also alias a column to ISYS_TITLE or ISYS_MODIFIED to control the title and last modified date for each record.
Example 1
SELECT
	Books.BookId AS ISYS_KEY_0,
	Books.Title AS ISYS_TITLE,
	Books.BookId,
	Books.Title,
	Books.ISBN,
	Books.Description
FROM
	Books
{{
WHERE
	(Books.BookId = ?)
}}
This is a simple example of a single table with a single key, the Book.Title will be used as the title; and the BookId is the identifying key.
Example 2
SELECT
	"dbo"."Orders"."OrderID" AS ISYS_KEY_0,
	"dbo"."Order Details"."UnitPrice",
	"dbo"."Order Details"."Quantity",
	"dbo"."Order Details"."Discount",
	"dbo"."Orders"."OrderID",
	"dbo"."Orders"."OrderDate",
	"dbo"."Orders"."RequiredDate",
	"dbo"."Orders"."ShippedDate",
	"dbo"."Orders"."ShipVia",
	"dbo"."Orders"."Freight",
	"dbo"."Orders"."ShipName",
	"dbo"."Orders"."ShipAddress",
	"dbo"."Orders"."ShipCity",
	"dbo"."Orders"."ShipRegion",
	"dbo"."Orders"."ShipPostalCode",
	"dbo"."Orders"."ShipCountry",
	"dbo"."Products"."ProductName",
	"dbo"."Products"."QuantityPerUnit",
	"dbo"."Products"."UnitPrice" AS UnitPrice_ALIAS_1,
	"dbo"."Products"."UnitsInStock",
	"dbo"."Products"."UnitsOnOrder",
	"dbo"."Products"."ReorderLevel",
	"dbo"."Products"."Discontinued"
FROM
	"dbo"."Orders"
	INNER JOIN "dbo"."Order Details"
		ON "dbo"."Orders"."OrderID"="dbo"."Order Details"."OrderID"
	INNER JOIN "dbo"."Products"
		ON "dbo"."Products"."ProductID"="dbo"."Order Details"."ProductID"
WHERE
	("dbo"."Orders"."EmployeeID" = 10)
{{
	And ("dbo"."Orders"."OrderID" = ?)
}}
This is a complex sample using the Northwind database, the SQL statement is across three tables with inner joins. It will also only index records where the EmployeeID is 10.