![]()
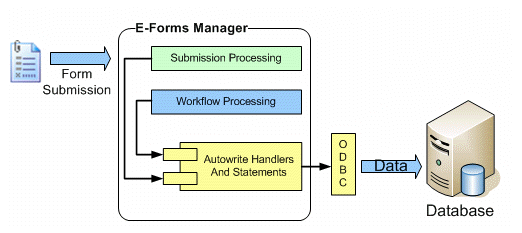
TransForm E-Forms Manager's Autowrite feature allows form data to be written to external databases upon every submission of a form, or based on workflow processing rules. Using Autowrite, when a form is submitted to the TransForm E-Forms Manager server, the server establishes a connection to a database and inserts or updates existing records using form data, SQL statements, and processing logic that you specify and configure from the TransForm E-Forms Manager interface. This powerful feature gives you the ability to fully automate integration between electronic forms and your organization's existing data repositories with no programming, and only the need for an ODBC connection between the TransForm E-Forms Manager server and the database. This technology allows data from your forms to be written to databases in your environment without ever having to connect directly to the data source. Instead, TransForm E-Forms Manager brokers the transaction between the form and the database using pre-configured settings that you can define and customize.
Autowrite allows integration with almost any variety of common relational database that allows ODBC or JDBC connectivity and understands SQL syntax. Examples include Oracle, Microsoft SQL Server, Sybase, MySQL, Microsoft Access, and others. The list of supported vendors is not specific since most of the syntax used for data integration is provided by the TransForm E-Forms Manager administrator, and TransForm E-Forms Manager itself is not aware of the type of database with which it is connected during Autowrite operations. This provides great flexibility in terms of the number and types of databases with which you can integrate form data.
Setup of a form for Autowrite requires three main steps, which include:
Configuring a Data Source for connecting to an external database using ODBC or JDBC
Defining one or more Autowrite SQL Statements that will write to database tables using dynamically-supplied form field data.
Creating Autowrite Handlers, which define the basic processing logic and assignment of Autowrite SQL Statements to individual form versions in the form catalog.
When you set the automation properties of a form version in the TransForm E-Forms Manager catalog, you can configure TransForm E-Forms Manager to run the form's Autowrite operations for every submission of that form. If you have the Workflow feature, you can additionally (or alternatively) set up Autowrite to run based on custom form processing rules.
Once configured and enabled, an Autowrite operation takes place using the sequence of events described below:
When the form is submitted, its assigned Autowrite Handlers are invoked. These can be called simply by the fact the form was submitted (Submission Handlers), or may be called based on workflow processing rules (Workflow Handlers).
Once a set of Autowrite handlers completes, if all statements were executed successfully, then the database transaction is committed, saving the data to the database. (If any of the statements fail, the database transaction is rolled back and a detailed error message is logged in TransForm E-Forms Manager.)
Autowrite operations that take form data and use it to create or update records in a database are all called upon electronic submission of a form to TransForm E-Forms Manager. This includes forms that are designed with a Submit button (see Editing Form Submission Properties) or those that are submitted via email to TransForm E-Forms Manager (see Email Submission.) No special form design tasks need to be performed to enable Autowrite for the form. Within the TransForm E-Forms Manager interface, it is the Autowrite Handlers associated with the form's automation settings that control how and under what circumstances data from the form will be sent to a database. These handlers can be configured under the main form automation settings, or as part of a form's workflow definition, allowing them to be called from workflow actions and thus dependent on workflow rule processing.
When more than one Autowrite handler is associated with a form version, or when more than one Autowrite handler is assigned to a workflow action, these handlers will be processed in the order assigned to them. As TransForm E-Forms Manager makes the database calls defined by the handlers, it executes the calls within a database transaction that isn't committed until all of the handlers complete successfully. (Note that this pertains only to databases that support SQL transactions.) If a database error occurs anywhere in the sequence of Autowrite handler executions, the transaction gets rolled back and the error message is logged.
When Autowrite operations are performed by TransForm E-Forms Manager, summary logging information is kept and made available under the Submissions/Form Data area of the TransForm E-Forms Manager interface. This allows you to check and see whether a forms's Autowrite operations are successful or failed, and to attempt retry of any failed operations.
In addition, the system writes detailed logging information to a file called efm-autowrite.log (or autowrite.log in versions prior to 7.5.0), which is located in the EFM\FSBServer\logs directory, relative to the location under which TransForm E-Forms Manager is installed. This file contains information on all successful and failed attempts at form-to-database integration.
The process of setting up form-to-database write operations involves the definition of several components, which include:
Data Sources - to provide connectivity to the operations' destination databases.
Autowrite Statements - to specify the SQL statements that will check for records in, retrieve supplemental data from, and update or create records in the destination databases using data from submitted forms.
Autowrite Handlers - to assign SQL statements to specific forms, and to define the basic logic regarding how a form's data should interact with the database.
Specific instructions for defining each of these types of components follows.
The first step in Autowrite setup is defining the connection or connections that TransForm E-Forms Manager will make to SQL-compliant databases in order to create or update records in tables in those databases. Each set of Autowrite handlers is assigned a Data Source that defines such a connection. Once one or more data sources have been defined, they are made available for selection as part of the Autowrite operation configuration process. Read the section on Data Source Configuration for step-by-step instructions on how to define Data Sources.
An Autowrite Statement is simply a pre-defined SQL statement that is used to perform operations on a database related to creation or update of records containing form data. Autowrite Statements are written using standard SQL syntax mixed with special tokens that can be replaced at execution time with form field data or other data elements related to a form's submission. An Autowrite Statement is assigned to an Autowrite Handler, which integrates form and/or submission-related data with the statement and executes the statement when a form is submitted - either on each submission or conditionally, as part of a form's workflow processing rules.
Autowrite Statements are categorized into four basic types that represent the kinds of actions they are meant to perform on the database:
Insert: A SQL INSERT statement that creates a new record in a database table.
Update: A SQL UPDATE statement that attempts to update one or more existing records in a database table.
Fetch: A SQL SELECT statement that can serve one of two main purposes:
To check for a pre-existing record or records in a table, in order to define conditional logic regarding whether form data should be used to perform table inserts or updates, or whether it should be used at all. When used for this purpose, such statements are referred to as Check Statements in Autowrite Handler configuration.
For example, a Check statement might be used to find an account record in a database's account table using an account_id field in a submitted form. By helping evaluate the existence of such a record, the statement helps in Autowrite handler logic to determine at runtime whether to run an Insert statement to create a new account, or to use an Update to modify an existing one.
To retrieve data before or after an insert or update that can be used to supplement form data in subsequent statement executions. When used for this purpose, such statements are referred to as Fetch Statements in Autowrite Handler and Statement configuration.
For example, a Fetch statement might be used to fetch an Oracle sequence value prior to inserting a record into a table that needs a primary key value from that sequence. The pre-defined Insert statement meant to run subsequently would contain a token referencing the Fetch statement's value.
When used in a Fetch operation, the columns and values named in the SELECT clause of a Fetch statement are made available for use in other Autowrite statements that might be configured to run following the execution of the Fetch. This allows data resulting from a Fetch statement execution to be dynamically placed into subsequent statements through the use of special placeholder tokens that reference the Fetch statement's columns. On the Autowrite Statement configuration screen, a select list is provided containing the columns of all defined Fetch statements, allowing them to be easily pasted into other statements as needed. Note that this does not apply when a Fetch statement is used in a Check operation.
Stored Procedure Call: A statement that can be used to call a stored procedure. The stored procedure can accept parameters but should not return a value or result set as any returned value or result set will be ignored.
Autowrite Statements generally consist of ANSI SQL syntax that can be understood by standard SQL-compliant relational databases. A SELECT, INSERT, or UPDATE statement may include vendor-specific syntax for calling embedded functions supported by the destination database. Statements may contain special tokens that act as placeholders for form field data or other submission-related information. A description of each of these tokens is below. Each type of Autowrite Statement must follow specific rules relating to its contents and format. These rules and examples are described below:
Fetch Statements must be written as SQL SELECT statements, and should conform to the following syntax rules:
SELECT Keyword: A Fetch Statement must begin with the SELECT keyword.
Column Naming: A Fetch Statement must name all of the columns whose data it is supposed to retrieve in the query. It cannot use “SELECT * “ to get all of the columns since TransForm E-Forms Manager needs a way to reference the individual data elements retrieved by the query. For example:
Valid:
SELECT location_id, location_name, city FROM branch_locations WHERE region = 'Midwest'
Invalid:
SELECT * FROM branch_locations WHERE region = 'Midwest'
Column Aliasing: You must provide aliases for values retrieved by your query when the values rely on functions, concatenations, or are prefixed with table names. For example:
Valid:
SELECT count(*) AS num_accounts FROM account WHERE account_id = $PFF.account_number
Invalid:
SELECT count(*) FROM accounts WHERE account_id = $PFF.account_number
Valid:
SELECT acct.account_number AS accountnum FROM account acct WHERE customer_name = '$PFF.customer_name'
Invalid:
SELECT acct.account_number FROM account acct WHERE customer_name = '$PFF.customer_name'
Using Joins: You may use table joins in your query, but when doing so, be sure to alias the columns you select so that your result set description does not contain table name references. For example:
Valid:
SELECT loc.location_id AS location_id, loc.location_name AS location_name, reg.city AS city FROM branch_locations loc, regions reg WHERE loc.region_id = reg.region_id AND reg.region_code = $PFF.regioncode
Invalid:
SELECT loc.location_id, loc.location_name, reg.city FROM branch_locations loc, regions reg WHERE loc.region_id = reg.region_id AND reg.region_code = $PFF.regioncode
Query Parameters: Any parameter supplied to a query, whether literal or using special tokens for runtime replacement, must be supplied so as to accommodate the data type contained in the column it references. So no quotes should be put around parameters referencing numeric columns, and single quotes should be placed around parameters referencing non-numeric columns such as character or date columns.
Sequence and Identity Value Retrieval: You may use statements that query sequences (Oracle) or Identity columns (Sybase, SQL Server) to retrieve pre- or post-insert primary key values. In doing so, you must follow the rules described above for Aliasing of columns. For example:
Oracle Sequence Fetch
SELECT account_sequence.nextval AS next_account_num FROM DUAL
Identity Column Fetch
SELECT @@IDENTITY as next_account_num
Insert Statements must be written as SQL INSERT statements. Since Insert statements do not retrieve any information needed by Autowrite operations, TransForm E-Forms Manager does not attempt to evaluate or parse them when they are saved. It simply replaces any placeholder tokens with actual data at runtime and executes them. This allows them to be written in any way that the destination database can understand, whether simple or complex. The only syntax rules that apply to Insert statements are:
INSERT INTO Keywords: An Insert Statement must begin with the INSERT INTO keywords, followed by a table name.
Quoting of Inserted Values: Any value supplied to the insert, whether literal or using special tokens for runtime replacement, must accommodate the data type contained in the column it references. So no quotes should by put around values or tokens referencing numeric columns, and single quotes should be placed around values or tokens referencing non-numeric columns such as character or date columns.
Example:
INSERT INTO account (account_id, customer_name, address, region_id)
VALUES ($STMT.account_sequence.nextaccountid, '$PFF.customername', '$PFF.customer_address', $PFF.regioncode)
Update Statements must be written as SQL UPDATE statements. Like Insert statements, Update statements do not retrieve any information needed by Autowrite operations, so TransForm E-Forms Manager does not attempt to evaluate or parse them when they are saved. It simply replaces any placeholder tokens with actual data at runtime and executes them. This allows them to be written in any way that the destination database can understand, whether simple or complex. The only syntax rules that apply to these statements are:
UPDATE Keyword: An Update Statement must begin with the UPDATE keyword, followed by a table name.
Quoting of Inserted Values: Any value supplied to the update, whether literal or using special tokens for runtime replacement, must accommodate the data type contained in the column it references. So no quotes should by put around values or tokens referencing numeric columns, and single quotes should be placed around values or tokens referencing non-numeric columns such as character or date columns.
Example:
UPDATE account
SET customer_name = '$PFF.customername',
address = '$PFF.customer_address',
region_id = $PFF.regioncode
WHERE account_id = $PFF.account_number
Stored Procedure Call Statements must be written using the following SQL escape syntax:
{call procedure-name[([parameter][,[parameter]]...)]}
where,
procedure-name specifies the name of the stored procedure to call. Depending on the database, the stored procedure name may need to include the database, schema, or package name.
parameter specifies an input parameter. Replacement tokens and literal values can be used to supply parameter values. Whether using a replacement token or a literal value, the value's type must correspond to the data type of the parameter. Place single quotes around tokens or values for non-numeric parameters and do not place quotes around values for numeric parameters.
Examples:
{call insert_employee('$SUBMITTED_BY', '$PFF.first_name', '$PFF.last_name')}
{call dbo.update_account($PFF.account_number, '$PFF.customer_name', $PFF.region_code, '$PFF.address', 2)}
Autowrite Handlers supply form field data, submission-related values, and values resulting from previously-run Fetch statements into Autowrite statements at the time of form submission, allowing them to write to (and retrieve from) databases with live form data and supplemental information. This is done through the use of elements placed into the statement definitions that use specialized tokens, which act as placeholders for actual data. The actual tokens used designate the source of the data elements. Tokens representing form field data and Fetch statement columns are followed by identifiers that reference specific form fields and table columns, allowing runtime substitution of placeholders with specific data values.
The list below describes and gives an example of each type of replacement token that can be used in an Autowrite statement.
|
Placeholder Type |
Replacement Token |
Replaced With |
|
Form Field Value (Form Data) |
$PFF.<field_name> |
Value of the submitted form’s field named <field name>. The actual field name may be found by opening the form in TransForm Designer, or by viewing the form's data export properties or results.
Example: INSERT INTO account (customer_name, address) VALUES ('$PFF.customername', '$PFF.customer_address')
|
|
Submission Tracking Number (Submission-Related Data)
|
$SUBMISSION_ID
|
The unique tracking number associated with a form submission.
Example: INSERT INTO form_submit_log (submit_id, employee_name) VALUES ($SUBMISSION_ID, '$PFF.employee_name')
|
|
Name of Form Submitter (Submission-Related Data)
|
$SUBMITTED_BY |
The first and last name of the user who submitted the form. This value is only available when submission of the form requires authentication.
Example: INSERT INTO form_submit_log (submit_id, employee_name) VALUES ($SUBMISSION_ID, '$SUBMITTED_BY')
|
|
User ID of Form Submitter (Submission-Related Data)
|
$SUBMITTED_BY_ID |
The login User ID of the user who submitted the form. This value is only available when submission of the form requires authentication.
Example: INSERT INTO form_submit_log (user_id, employee_name) VALUES ('$SUBMITTED_BY_ID', '$SUBMITTED_BY')
|
|
Submission Timestamp (Submission-Related Data) |
$SUBMISSION_DATE |
Date and time that the form was submitted to TransForm E-Forms Manager
Example: INSERT INTO form_submit_log (submit_id, submit_date) VALUES ($SUBMISSION_ID, '$SUBMISSION_DATE')
|
|
Value from previously-run Fetch Statement
(SQL-provided Data)
|
$STMT.<statement>.<column> |
When an Autowrite Handler runs a fetch statement, the values it retrieves are available for use in subsequent Autowrite statements run within the same transaction, whether they are part of the same handler or in a following one. For a statement to use a value from a prior Fetch statement, the replacement token syntax is $STMT followed by the Fetch statement name, followed by the name of a column named in the SELECT portion of the Fetch statement.
For example, if a Fetch statement name "DeptIDFetch" is used to retrieve a numeric department ID using a department description from a form,
SELECT department_id FROM departments WHERE department_name = '$PFF.department_name'
an Update statement that runs after this Fetch and needs to use the ID retrieved would be written like:
UPDATE employee SET employee_first_name = '$PFF.first_name', employee_last_name = '$PFF.last_name', department = $STMT.DeptIDFetch.department_id WHERE employee_id = $PFF.employee_id
The Autowrite Statement configuration screen provides a list of available Fetch statement columns so that you don't have to remember or type the name of the statement and column to reference it.
|
|
Form Submission Reference Key |
$SUBMISSION_REF_KEY |
When this token is used in an Autowrite statement, it is automatically replaced with a unique reference key character string the identifies the form submission within TransForm E-Forms Manager.
|
|
URL for downloading a copy of the submitted form |
$SUBMITTED_FORM_PFF_URL |
When presented in applications that display data from a TransForm E-Forms Manager Autowrite operation, a value resulting from this token can be used to provide a link back to TransForm E-Forms Manager that requests a copy of the submitted form as a downloadable .pff file.
If the form's download settings specify that authentication is required to download the form, then users who click a link made with this token will have to authenticate using the authentication scheme assigned to the form download operation.
|
|
URL for opening the submitted form in TransForm iFiller |
$SUBMITTED_FORM_IFILLER_URL |
When presented in applications that display data from a TransForm E-Forms Manager Autowrite operation, a value resulting from this token can be used to provide a link back to TransForm E-Forms Manager that requests a copy of the submitted form in the TransForm iFiller interface, for viewing in a browser.
If the form's download settings specify that authentication is required to download the form, then users who click a link made with this placeholder will have to authenticate using the form's download authentication scheme in order to open it in TransForm iFiller.
|
|
URL for downloading a workflow process' most recently submitted form |
$BP_SUBMITTED_FORM_PFF_URL |
If the form's workflow settings have business process tracking enabled, then this placeholder gets replaced with a URL that can be used to request a PFF copy of the most recently submitted form in the business process associated with the submission. This allows applications that display data from the Autowrite operation to display links back to TransForm E-Forms Manager for downloading a PFF copy of the most recent submission related to a particular submission's workflow process.
If the form's download settings specify that authentication is required to download the form, then users who click a link made with this token will have to authenticate using the authentication scheme assigned to the form download operation.
|
|
URL for opening a workflow process' most recently submitted form in TransForm iFiller |
$BP_SUBMITTED_FORM_IFILLER_URL
|
If the form's workflow settings have business process tracking enabled, then this placeholder gets replaced with a URL that can be used to request an TransForm iFiller rendition of the most recently submitted form in the business process associated with the submission. This allows applications that display data from the Autowrite operation to display links to an TransForm iFiller instance for opening the most recent submission related to a particular submission's workflow process in the browser.
If the form's download settings specify that authentication is required to download the form, then users who click a link made with this placeholder will have to authenticate using the form's download authentication scheme in order to open it in TransForm iFiller. |
|
Document Type ID |
$DOCUMENT_TYPE_ID |
The unique document type identifier associated with a form. All versions of a form that is submitted will have the same document type identifier.
Example: INSERT INTO form_submit_log (submit_id, document_type, employee_name) VALUES ($SUBMISSION_ID, '$DOCUMENT_TYPE_ID', '$PFF.employee_name')
|
When creating an Autowrite Handler, you are asked to specify an Export Type for the handler, with which you choose either Single, Multiple, or Multiple Repeating. This selection determines whether the handler will attempt a single operation against the database using one set of field data from the form, or attempt multiple operations using tabular or repeating sets of fields.
For example, an invoice form might contain header information along with individual line items that exist in a table control. To create new invoice information in your database using this form, you may want to insert a single header record with data from the top portion of the form into an "invoice_header" table. To create an "invoice_header" record, you would use a standard Insert statement as described above. However, to create multiple records in an "invoice_lineitem" table with the field data from the form's table rows, there are a couple of additional requirements related to the naming of form fields in the form design itself, and the syntax used in the Autowrite Statement that inserts the repeating data sets. These requirements are described in detail below.
Any sets of fields in the form that are to be processed in a repeating fashion by Autowrite Handlers must be either exist in a Table control in the form design, or, if they are not in a Table control, they must adhere to a specific naming convention that allows TransForm E-Forms Manager to understand them as repeating data sets.
When you use a Table control in your form design, TransForm Designer takes care of naming the table fields, such that each field contains information in its name that identifies the row and column position of the cell it represents. When a form containing a Table control is placed in the TransForm E-Forms Manager catalog, TransForm E-Forms Manager determines that there is a table in the form, and is thus able to make the fields in the table control available for Autowrite operations using a Multiple-Repeating type of Autowrite Handler as long as the Autowrite Statement contains the proper field naming syntax (described below).
If you used a Table control in TransForm Designer to create the section of the form, the fields representing table cells were automatically assigned names that represent their row and column position in the table, e.g., Table1.ColB[1], Table1.ColB[2], etc. TransForm E-Forms Manager uses this information to allow table fields to be processed by Multiple-Repeating Autowrite operations, and no renaming of table cell fields is necessary.
If instead you want to use standard fields for a multiple-row Autowrite operation instead of using a table, you must pay special attention to how you name the fields that you wish to reference in your Autowrite statements. For non-Table fields, TransForm E-Forms Manager expects the following with regard to the naming of repeating fields so that they may be identified by the system for use with this type of Autofill:
Each field name must end with a number representing the row in which the field exists.
Row numbers represented in the field names should be sequential.
Names of fields that fall within the same "column" must be identical up to the row number at the end of the field name.
For example, let's use a tabular layout using standard text fields instead of a table control. The fields in the Description column are named description_1, description_2, description_3, and so on. Fields in the Quantity column are named qty_1, qty_2, qty_3, and so on. The number at the end of each field name identifies the order in which it should be populated relative to the record set retrieved from the database. So you may create as many rows as you wish, but you must be sure to name them so that in each "cell" the number at the end of the field is exactly 1 more than in the previous row, and the rest of the field names must exactly match the field names in the prior row.
NOTE: If you want to use Autowrite to use rows of data that span more than one page of a form, you cannot use Table control in your form design, since a Table can only sit on a single page. You should instead use standard text fields that conform to the naming convention described above.
In order for an Autowrite Statement to be used by an Autowrite Handler that is designed to iterate through tabular or repeating sets of data in the form, you must employ specialized naming of the form fields when referencing them in your statement. This is essentially a "wildcard" type of naming convention that allows the statement processor to dynamically gather information from tabular fields based on the current form row being processed, and looks essentially like this:
|
Repeating (Tabular) Form Field Names |
SQL Statement Placeholder |
SQL Statement |
|
description_1, description_2, description_2, etc.
(Standard form fields - no table)
|
$PFF.description_#
|
INSERT INTO INVOICE_LINEITEM (description, quantity, cost) VALUES ($PFF.description_#, $PFF.qty_#, $PFF.rate_#) |
|
Table1.ColA[1], Table1.ColA[2], Table1.ColA[3], etc.
(Table with default naming)
|
$PFF.Table1.ColA[#]
|
INSERT INTO INVOICE_LINEITEM (description, quantity, cost) VALUES ($PFF.Table1.ColA[#], $PFF.Table1.ColB[#], $PFF.Table1.ColC[#])
|
|
LineItems.Description[1], LineItems.Description[2], LineItems.Description[3], etc.
(Table with custom naming of table and columns)
|
$PFF.LineItems.Description[#]
|
INSERT INTO INVOICE_LINEITEM (description, quantity, cost) VALUES ($PFF.LineItems.Description[#], $PFF.LineItems.Quantity[#], $PFF.LineItems.Rate[#])
|
In addition to the wildcard-style field references used in Autowrite statements for repeating operations, you may of course also use standard replacement tokens if you want to refer to specific fields whose values will be reused for each repeating operation. You may also use the tokens representing submission data and Fetch statement columns.
More detail is provided later on in this document regarding the setup of the repeating type of Autowrite Handler, where you may customize when and how each row in a table gets processed, put conditions on whether to process rows, etc.
The process of creating an Autowrite Statement in TransForm E-Forms Manager consists mainly of choosing the type of statement you want to create, then entering the SQL statement using the syntax rules and placeholder tokens described above in order to make the statement perform a desired action on a database.
First, navigate to the Autowrite Statements list, by choosing Administration from the main menu, then choosing the DB Integration option.
This will open a screen containing a tab labeled "Autowrite." Clicking this tab will show the list of any Autowrite statements that have been defined.
To define a new statement, click the New Autowrite Statement link. To edit an existing statement, click the Edit icon in one of the items in the list. This will open the Autowrite Statement configuration window.
This screen gathers the following information:
Statement Name: A name that you assign to the statement. This should be descriptive enough that it can be easily recognized and chosen from a list during the Autowrite Handler setup process.
Statement Type: Choose whether you want to define a Insert, Update, Fetch, or Stored Procedure Call statement. For more information on statement types, see the overview of Autowrite Statements.
Description: Enter a brief description of what the statement is intended to do. You may mention the table it acts on and/or the business process it is a part of. This description is made available in the Autowrite Handler definition screens to assist when choosing which statements to use.
SQL Statement: Enter the actual SQL statement, making use of placeholder tokens as necessary in order to integrate form field, fetch statement, and submission-related data. For more information on how to write the statement, see Autowrite Statement Syntax.
If your statement needs to make reference to columns or values that result from Fetch statements intended to run before the statement you are defining, you may make use of the Fetch Statement Columns control below the SQL Statement field.
Simply find the item in the list containing the Fetch statement and column that you want to use, click the + button. This will put the chosen placeholder token into the SQL statement.
When you have entered the required information, click the Save button. If your entries are valid, your statement will appear in the list, and will be available for use in setup of Autowrite Handlers.
The purpose of an Autowrite handler is to bring together a form and one or more SQL statements that can make use of the form's data at submission time to write form data to a database. In defining an Autowrite handler, you provide this mapping of a form to Autowrite statements. In addition, you can define certain rules that check the database for existing information, and then determine whether and when to execute inserts or updates on the database depending on the results.
Autowrite Handlers come in three types: Single, Multiple, or Multiple-Repeating. Assigning the Single designation to a handler tells the system that it is meant to execute only one statement against a database using a set of data from a submitted form. The Multiple designation to a handler tells the system that multiple records will be inserted or updated (only available in version 7.5.0 or later). The Multiple-Repeating designation, on the other hand, defines the handler as one that can run the same SQL insert or update statement repeatedly while iterating through rows of tabular or repeating sets of fields in the form. In defining a multiple-repeating handler, you are asked to provide additional information, such as the range of rows in the form that will be used in database operations, and optionally a conditional expression that allows you to control when to ignore rows of data.
Autowrite Handlers can be created so as to run whenever a form is submitted, or may be created within a form's Workflow settings, allowing them to be invoked by workflow actions to which they may be assigned.
To create an Autowrite Handler that will run whenever a form is submitted:
Find the form in the catalog, and navigate to where you can edit its automation settings. (For help with this, see Autowrite Tab).
This tab contains two sections - one related to general Autowrite settings for the form, and the other containing the actual list of handlers. In the first section, choose the Data Source representing the database connection on which you want the handlers to act, and whether or not you want to enable Autowrite for form submission.
If there are any existing Autowrite handlers for form submission, they will be listed in the lower section.
You can create a new handler by clicking the New Autowrite Handler link above the list, or you can edit an existing one by making sure it is disabled first then clicking its Edit icon. This will open the Autowrite Handler configuration window.
This screen prompts you for the following information:
Handler Name: Enter a name for the handler that accurately describes its purpose.
Export Type: Choose Single if at most one record will be inserted or updated in the target database, Multiple if multiple records will be inserted or updated, or Multiple-Repeating if you want it to iterate through repeating or tabular rows/sets of fields in the form, and issue statements to the database for each. The Multiple export type is only available in version 7.5.0 or later.
Order: If you are defining more than one handler to run on submission of the form, choose the order in which you want it to execute.
Export Option: Here you start to define what the handler should attempt to do when a form is submitted. Options are:
Option 1 - Always Insert: Choose this if you want the handler to simply insert a record into a table for each and every submission of the form. If you choose this option, you will be asked on the next screen to specify the Autowrite Insert statement that will be used.
Option 2 - Check then Insert: This option specifies that the handler will first run a Fetch statement to look for one or more existing records in a table, then run an insert if no records are found. This should be used when you want to insert new records for submitted forms only when a record represented in the form does not already exist. The next screen will require you to specify a Fetch statement that will be used to check for existing records, and an Insert statement that will be used to create a new record with form data.
Option 3 - Always Update: Choose this if you want the handler to simply update a table for each and every submission of the form. If you choose this option, you will be asked on the next screen to specify the Autowrite Update statement that will be used.
Option 4 - Check then Update or Insert: This option is used to query the database for a specific record, then insert a new one if no such record exists or update if it does. If chosen, the next screen will require you to select an Fetch statement for the check, along with an Insert and Update statement.
Option 5 - Call Stored Procedure: This option is used to call a specific stored procedure. If chosen, the next screen will require you to select a Stored Procedure Call statement. This option is only available in version 7.5.0 or later.
Make a selection that matches the behavior you want the handler to use, then click the Next button.
The contents of the second screen will differ based on the export option chosen on the first screen.
Required fields on this screen include:
Check Statement: A selection is required for the export options that check for records first. Its list of statements contains any Autowrite statements of the Fetch type. The handler will run this statement first. The running of the subsequent statements in the handler depends on whether the check statement finds any records.
Pre-Insert Fetch: This selection is always optional. The list of statements includes all Autowrite statements of the Fetch type. When you choose a statement here, any values it retrieves are made available for use in subsequent Insert statements used by the handler. This type of statement is ideal for obtaining an Oracle sequence value that can be used in a following insert statement. It can also be used to retrieve supplemental data from the database that doesn't exist in the submitted form for use in an Insert statement that follows it.
Insert Statement: A selection is required if you chose an option that may involve an insert. The list of statements in this field consists of all Autowrite statements of the Insert type.
Pre-Update Fetch: This selection is always optional. The list of statements includes all Autowrite statements of the Fetch type. When you choose a statement here, any values it retrieves are made available for use in subsequent Update statements used by the handler. This type of statement can also be used to retrieve supplemental data from the database that doesn't exist in the submitted form for use in an Update statement that follows it.
Update Statement: A selection is required if you chose an option that may involve an update. The list of statements in this field consists of all Autowrite statements of the Update type.
Post-Insert/Update Fetch: This selection is always optional. The list of statements includes all Autowrite statements of the Fetch type. A statement selected here can be used to retrieve a value from the database such as an Identity or Auto-increment column value following the insert of a new record. Or it can be used to retrieve other information from the database that can be used in subsequent Autowrite handlers. Any values retrieved from this statement are made available for use in Autowrite statements in handlers that run after the one being defined. For example, a form may have two handlers defined - one to create an invoice header record and another to create line item records after the header is created. If the line item records require a primary key value generated in an identity column on the header record insertion, then the handler that creates the header record can use a post-insert fetch to retrieve the new header record's key value. The next handler that creates line items can use this key value by using Insert statements that use the placeholder token reference to the fetch statement column that represents the new header key value.
You can view the description of any of the statements selected on this screen by clicking the View Statement link next to the selected statement.
Once you have made your choices on this screen, click Next or Finish.
If you chose the Single or Multiple export type in step 1, then your handler configuration is complete. However, if you chose the Multiple-Repeating type, another screen will prompt you for additional information that will determine how the handler will iterate through repeating sets of data in the form to perform database operations with them.
Items you can specify on this screen include:
Records Range: This required setting allows you to specify exactly which rows of fields you want to make available to the Autowrite Handler for database operations. This limits the number of rows the handler iterates through while processing the form, and can tell it to skip rows that aren't meant for database integration. Many tables use read-only fields in the first row as labels, or supply formula-based rows in the middle or end of a table - rows which probably do not contain the type of data you would want to export to a database. So this is useful when you want to start or end the processing of table data on a specific row, or exclude specific rows or ranges from Autowrite operation. To specify the rows or ranges of rows you want to populate, you can:
Use a hyphenated range of rows, such as 1-10: This would use rows 1 through 10 of the table in database operations.
Use a comma delimited list of specific rows, such as 2,3,4,6,10. This would use rows 2, 3, 4, 6, and 10 in database operations, skipping the rows excluded.
Use a combination of hyphenated range(s) and comma delimited specific rows, such as 2, 3-8, 11. This would use rows 2, 3 through 8, and 11 in database operations, skipping the rows excluded.
Whether you wish to have the Autowrite handler skip processing of specific rows or not, you must always specify a range here. If you want the handler to process all rows, just specify 1-x where x is the number of rows in the table.
Condition: In this field, you can optionally enter an expression that the handler evaluates while processing each tabular row of the submitted form in the range specified, using data from each row to determine whether to perform database operations with its data. This is important because you only want operations to be performed using information from rows where there is sufficient data.
For example, an invoice form may contain 20 rows of line item fields, and the Records Range setting for the Autowrite handler might tell it to process rows 1-20 of the table. However, if only two of the line item rows in a submitted invoice form contain any data, you don't want the system to attempt database operations with all 20 rows. Instead you would want to limit database interaction to the two populated rows.
Entering the proper conditional expression here will allow the system to check one or more of each rows' data fields and use their values (or lack thereof) in determining whether or not to process the row.
A conditional expression either evaluates to true or false. If the expression evaluates to true, then the row in question is processed. Otherwise the row is skipped. Several items can be used to define a conditional expression for Autowrite processing of table rows. These items are explained below:
Form Fields: All fields in the form that conform to the naming convention needed for the Multiple-Repeating type of Autowrite processing are available to be used in a conditional expression, and can be selected and added to the expression using the Form Fields control on this screen.
To add a form field to a conditional expression, select the form field from the Form Fields drop down list and click the + button next to it.
Operators: Operators can be used in a conditional expression to compare values or perform mathematical operations. The following operators are available to be used in conditional expressions:
|
Operator |
Usage |
Example |
|
= |
Evaluates two numeric or text values and determines if they are equal. |
$PFF.Table1.ItemCode[#] = 1
$PFF.Table1.ItemDesc[#] = "Computer" |
|
!= |
Evaluates two numeric or text values and determines if they are not equal. |
$PFF.Table1.UnitPrice[#] != 0 |
|
> |
Evaluates two numeric values and determines if the value on the left is greater than the value on the right. |
$PFF.Table1.UnitPrice[#] > 0
|
|
< |
Evaluates two numeric values and determines if the value on the left is less than the value on the right. |
$PFF.Table1.UnitPrice[#] < 1000
|
|
>= |
Evaluates two numeric values and determines if the value on the left is greater than or equal to the numeric value on the right. |
$PFF.Table1.UnitPrice[#] >= 0
|
|
<= |
Evaluates two numeric values and determines if the value on the left is less than or equal to the value on the right. |
$PFF.Table1.UnitPrice[#] <= 1000
|
|
+ |
Adds two numeric values or concatenates text values together. |
$PFF.Table1.UnitPrice[#] + $PFF.Table1.Tax[#] > 0
$PFF.Table1.ItemDesc[#] + " " + $PFF.Table1.ItemCode[#] = "Computer 222"
|
|
- |
Subtracts a numeric value on the right from the numeric value on the left. |
$PFF.Table1.UnitPrice[#] - $PFF.Table1.Tax[#] > 0
|
|
* |
Multiplies two numeric values. |
$PFF.Table1.UnitPrice[#] * $PFF.Table1.TaxRate[#] > 0.5
|
|
/ |
Divides the numeric value on the left by the numeric value on the right. |
$PFF.Table1.UnitPrice[#] / $PFF.Table1.TaxRate[#] > 0
|
|
AND |
Evaluates two or more expressions and returns true if all expressions are true. |
$PFF.Table1.UnitPrice[#] != 0 > AND Table1.ItemCode[#] = "ABC"
|
|
OR |
Evaluates two or more expressions and returns true if any of the expressions are true. |
$PFF.Table1.ShiptoState[#] = "VA" OR $PFF.Table1.ShiptoState[#] = "MD" OR $PFF.Table1.ShiptoState[#] = "DC"
|
To add an operator to a conditional expression, select the operator from the Operators drop down list and click the + button next to it.
Functions: The following functions can be used in conditional expressions:
|
Function |
Usage |
Example |
|
IsBlank |
Evaluates the value of a field in the submitted form to determine if it is empty.
Syntax: IsBlank(FormFieldName)
|
IsBlank(Table1.ItemCode[#]) This evaluates to TRUE if the ItemCode[X] field in the row being processed of the submitted form is empty. |
|
IsNotBlank |
Evaluates the value of a field in the submitted form to determine if it is NOT empty.
Syntax: IsNotBlank(FormFieldName)
|
IsNotBlank(Table1.ItemCode[#]) This evaluates to TRUE if the ItemCode[X] field in the row being processed of the submitted form contains a value.
|
To use a function in a conditional expression, select the function from the Functions drop down list and click the + button next to it.