SQL Wizard
The SQL indexing wizard is launched when you create or edit an SQL indexing rule. When creating a new SQL indexing rule, you will be given the following options to help define the data that you wish to index.
- All columns in a single table
This option allows you to select a single table within the database. All columns within the table will be automatically selected for indexing and any keys that are defined in the table will be configured. - One or more related tables
This option is used to index one or more related tables that have definable relationships, generally those defined by Foreign Keys. Where possible, this option will automatically establish relationships between the selected tables. - Custom SQL query
This option is for advanced use and allows you to enter your SQL query directly. It requires detailed knowledge of SQL syntax.
For more information on writing a custom query, see SQL Editing -> Modifying the SQL text for details.
Enter SQL rule name
The first step of creating a new SQL indexing rule is to specify a name for the rule. The name helps identify the data source where each record was fetched. Choose a name that logically identifies that data you wish to index.
Select the Database Driver
Perceptive Enterprise Search supports connecting to a database via either ODBC, ADO or BDE. Common mappings between database and drivers are provided, if your database is not in the list, select the driver mechanism that your database vendor provides.
Database Connection String
The connection string is the database driver dependent connection details for the database you wish to index. Click Browse button to select the database.
Select the Tables
Perceptive Enterprise Search displays all the tables and views that are available in the selected database. Select one or more related tables that you wish to index. You can select multiple items by checking the box at the left of the table.
Columns and Relationships
The columns and relationships allows you to select the columns that are to be indexed from each table, and how the multiple tables are related to each other. When indexing multiple tables, all the tables you have selected must have some form of relationship with each other (as shown below). Tables that have not been linked to are considered "orphaned" and will prevent the SQL rule from running.
Perceptive Enterprise Search will automatically link the tables that it knows to be related.
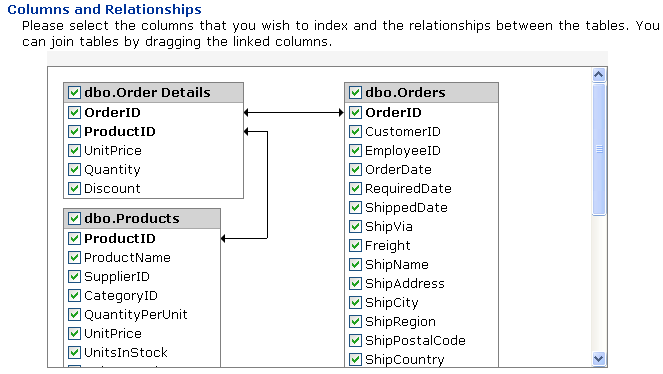
The screen shows the selected tables, their columns and any relationships between the tables. Columns shown in bold are known to be a primary key. Check the tick box to the left of each column that you wish to index, if you wish to index all columns in a given table, check the tick box to the left of the table name.
Removing a table
You can remove a table from the SQL rule by right clicking the table and selecting "Remove Table".
Adding New Joins
Perceptive Enterprise Search will try to identify and automatically join any selected tables, if this is not possible, you will need to manually join the tables before you proceed. To join two tables, select the column from the first table then drag it to the column in the second table and release the mouse button.
The relationship between two tables is indicated by a line with arrows between the two tables. The arrows point to the columns that join the tables.
Join Options
You can control how two tables are joined by right clicking on the relationship line.
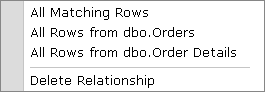
All Matching Rows indicates that only records that have values in both tables will be indexed.
All Rows from "X Table" indicates that all records from the X table will be indexed and only the records from Y table where the joined fields are equal.
All Rows from "Y Table" indicates that all records from the Y table will be indexed and only the records from X table where the joined fields are equal.
Delete Relationship will remove the relationship between the two tables.
Select Record Identifiers
Perceptive Enterprise Search must be able to uniquely identify each record returned by either one or more columns, generally the primary key. When working with a single table, it is usually sufficient to select one key. However complex SQL rules involving multiple tables, may require multiple keys to be selected.
You will be presented with a list of all columns from all selected tables. Columns marked with an asterisk (*) columns are known to be a primary key.
For new SQL rules, Perceptive Enterprise Search will automatically check the primary key fields for you.
Performance
At any given time, Perceptive Enterprise Search may request an SQL record using the key columns provided here. To obtain the best performance, it is recommend that you use columns that are primary keys or that are indexed. If unsure, contact your database administrator.
Title Column
This section gives you to opportunity to identify "special" fields from the dataset. Perceptive Enterprise Search will use these fields for different tasks during the indexing process, including setting the record title.
Title Column
Specifies the field to use as the Perceptive Enterprise Search document title entry in the index. By default, the first column with a string data type will be selected.
Changed record indicator
Perceptive Enterprise Search will use this value to decide if a record has changed since it was lasted indexed. You can select either Calculated, which will look for changes in any field, or choose from among the fields you have selected.
You can boost indexing performance if you have a single field that changes each time the record is updated. If this field is of date or timestamp format, it's value will be shown in Perceptive Enterprise Search as the "Last Modified" date. If the value is not of date type, the field will be check summed and store for comparison.
Order by
Specifies the order in which to add documents to the Perceptive Enterprise Search index. You can select either Default Order, which results in the order that the records are returned from the database system, or choose from the fields you have selected.
Completion
Once you have completed the minimal steps required, you will be presented with the review screen. This contains a summary of all the options you have selected, you can also preview the SQL that has been generated.
If you are happy with the selected settings, click Finish.